
Drywall installation is one of the most important phases of any home renovation or construction project. Whether you’re remodeling a kitchen, finishing a basement, adding a new room, or repairing damaged walls, drywall sets the foundation for how your interior will ultimately look and feel. Smooth walls, clean corners, and durable finishes all start with proper preparation.
At Bakir Contracting, we’ve seen firsthand how preparing your home correctly can make drywall installation in Edmonton faster, cleaner, and far more successful. Homeowners who take the time to prepare their space not only help the installation process go smoothly but also ensure long-lasting, professional results.
In this comprehensive guide, we’ll walk you through how to prepare your home for drywall installation, what to expect before work begins, and how working with experienced contractors like Bakir Contracting makes all the difference.
Why Preparation Is Essential Before Drywall Installation
Drywall installation in Sherwood Park is not just about hanging sheets on walls. It involves precise measurements, fastening, taping, mudding, sanding, and finishing. Without proper preparation, even the best drywall materials and skilled installers can run into issues such as uneven surfaces, delays, dust spreading throughout the home, or costly rework.
Proper preparation helps:
-
Reduce installation time
-
Protect your home and belongings
-
Improve drywall finish quality
-
Prevent safety hazards
-
Avoid last-minute changes and repairs
By following the steps below, you can help ensure your drywall project stays on track from day one.
1. Clear the Work Area Completely
The first and most important step is clearing the area where drywall installation will take place. Drywall sheets are large, heavy, and require open space for safe handling and installation.
What to do:
-
Remove furniture, décor, rugs, and wall hangings
-
Clear floors of obstacles and fragile items
-
Empty closets if drywall work will occur inside them
If some items cannot be moved, cover them thoroughly with plastic sheets or drop cloths. Drywall dust is extremely fine and can settle on surfaces throughout your home if not properly contained.
Pro tip: Clearing extra space helps drywall installers work more efficiently, reducing installation time and improving safety.
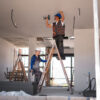
2. Create a Safe and Accessible Work Environment
Safety is critical during drywall installation. Drywall sheets, tools, ladders, and scaffolding all require a stable, hazard-free environment.
Steps to improve safety:
-
Ensure clear walkways and access points
-
Secure loose flooring or uneven surfaces
-
Remove tripping hazards such as cords or clutter
-
Keep pets and children away from the work zone
Good ventilation is also important, especially during taping and sanding. Opening windows or ensuring airflow helps reduce dust buildup and improves indoor air quality during the project.
At Bakir Contracting, safety is a top priority on every job site, but homeowner preparation plays a key role in maintaining a secure workspace.
3. Inspect Walls, Ceilings, and Framing
Before drywall goes up, it’s essential to inspect what’s behind it. Drywall will cover everything, so now is the time to identify and resolve any underlying issues.
Check for:
-
Structural damage or uneven framing
-
Water stains or moisture issues
-
Mold or mildew
-
Cracks or compromised studs
Addressing these problems before drywall installation prevents future repairs and ensures a solid, long-lasting finish. If your project involves framing or repairs, this step is especially important.
Bakir Contracting is a professional contractors for drywall, who can identify issues early and recommend solutions before installation begins.
4. Complete Electrical and Plumbing Work First
Drywall should always be installed after electrical, plumbing, and HVAC rough-ins are completed. Once drywall is installed, making changes becomes significantly more difficult.
Before drywall installation:
-
Ensure electrical wiring is complete and inspected
-
Install outlet boxes, switches, and lighting fixtures
-
Finalize plumbing lines and venting
-
Confirm HVAC ducts and vents are properly placed
This planning step prevents unnecessary drywall removal later and helps keep your renovation timeline on schedule.
5. Mark Studs, Outlets, and Fixtures
Once rough-ins are complete, it’s helpful to clearly mark the locations of studs, electrical boxes, and plumbing fixtures.
Why this matters:
-
Helps installers secure drywall accurately
-
Prevents covering outlets or fixtures incorrectly
-
Ensures proper alignment and clean cutouts
Marking these areas saves time during installation and reduces the risk of mistakes.
6. Set Up Dust Control Measures
Drywall installation and sanding generate a significant amount of dust. Without proper containment, this dust can travel throughout your home, settling on furniture, floors, and HVAC systems.
Effective dust control strategies:
-
Seal doorways with plastic sheeting
-
Cover air vents and returns
-
Use drop cloths on floors
-
Close off unused rooms
Containing dust protects the rest of your home and makes cleanup much easier once the project is complete.
7. Prepare Floors and Surfaces
Even though drywall is installed on walls and ceilings, floors often take the most abuse during the process.
Protect your floors by:
-
Covering them with drop cloths or protective paper
-
Securing coverings to prevent slipping
-
Removing delicate or easily damaged flooring if possible
This step is especially important during sanding, when dust and debris are most likely to spread.
8. Understand the Drywall Installation Process
Knowing what happens during drywall installation helps you prepare mentally and physically for the process.
Typical stages include:
-
Hanging drywall sheets
-
Securing drywall to studs and ceilings
-
Taping joints and seams
-
Applying joint compound
-
Sanding and smoothing surfaces
-
Final inspection and finishing
Each stage requires time to dry and cure properly, so patience is essential for achieving professional-quality results.
Common Mistakes to Avoid Before Drywall Installation
To ensure a smooth project, avoid these common mistakes:
-
Leaving furniture or clutter in work areas
-
Skipping inspections for moisture or structural damage
-
Forgetting electrical or plumbing rough-ins
-
Ignoring dust containment
-
Rushing the process
Avoiding these issues helps your drywall project stay efficient and professional.
Also read: Why drywall replacement matters
Why Choose Bakir Contracting for Drywall Installation?
Bakir Contracting provides reliable, high-quality drywall installation services for residential renovation and remodeling projects. Our experienced team understands the importance of preparation, precision, and attention to detail at every stage.
Our services include:
-
Drywall installation and replacement
-
Wall and ceiling repairs
-
Renovation and remodeling support
-
Residential interior finishing
-
Professional project coordination
We work closely with homeowners to ensure their spaces are properly prepared and finished to the highest standards.
FAQs
1. How should I prepare my home before drywall installation?
A. Clear the area, protect furniture and floors, complete electrical/plumbing work, and set up dust barriers to ensure a smooth installation.
2. Do I need to move all my furniture for drywall work?
A. Ideally, yes. If not possible, cover items with drop cloths or plastic sheeting to protect them from dust and debris.
3. How long does drywall installation usually take?
A. Timing depends on the project size, but most residential installations are completed within a few days to a week, including taping and sanding.
4. Can drywall be installed over existing walls?
A. Yes, in many cases drywall can be installed over existing walls if they are flat, clean, and free of moisture or structural issues.
5. Why should I hire a professional drywall contractor?
A. Professional contractors like Bakir Contracting ensure precise installation, smooth finishes, proper safety, and long-lasting results.

0 Comments